iOS Integration
This SDK is Outdated. We no longer support this version. Please visit: https://docs.instamojo.com/v1.1/page/ios-sdk
Overview
What all can I expect?
With this SDK, your customers would be able to pay using:
- Credit / Debit Cards
- EMI
- Netbanking
- Wallets
- UPI
What do I need?
- Back end server
- Client Id, Client Secret and Salt from dashboard. Note that sandbox and production credentials are different.
Before proceeding further, have the above requisites up and ready.
Production Integration
At the end of this integration, you will be able to make payments on your production environment. Ensure to get your credentials from Instamojo Dashboard
Using Cocapods (Highly recommended)
- Uncomment “use_frameworks!” in your podfile as Instamojo was built using Swift. Add the following Snippet to your Pod file
If you are using Xcode 9.0 (Swift 3.2 && Swift 4.0)
pod 'Instamojo', :git => 'https://github.com/Instamojo/ios-sdk.git', :tag => '1.0.10'
pod 'InstaMojoiOS', '0.0.2'
If using Xcode 9.1 (Swift 3.2.2 && Swift 4.0.2)
pod 'Instamojo', :git => 'https://github.com/Instamojo/ios-sdk.git', :tag => '1.0.12'
pod 'InstaMojoiOS', '0.0.3'
- Run Pod Install
- Make sure the InstaMojoiOS pod is always in the updated version: you can check it here
- If you are using older version, Run pod update
Always use the latest version
Manually
- For InstaMojo manual integration, please refer https://docs.instamojo.com/page/ios-sdk#section-manually
- For InstaMojoiOS integartion, download the framework from https://github.com/shardullavekar/InstamojoiOS/raw/master/InstaMojo-0.0.2.tar.gz
Open it to unzip and add InstaMojoiOS.framework file to your project - Select Target, Navigate to Build Phases and under Embedded Binaries click on “+” and select InstaMojoiOS.framework
Embedding Binaries
This process ensures that the added framework will be embedded within the App bundle. It also helps sharing the code between the app and extension bundles.
Using Objective C?
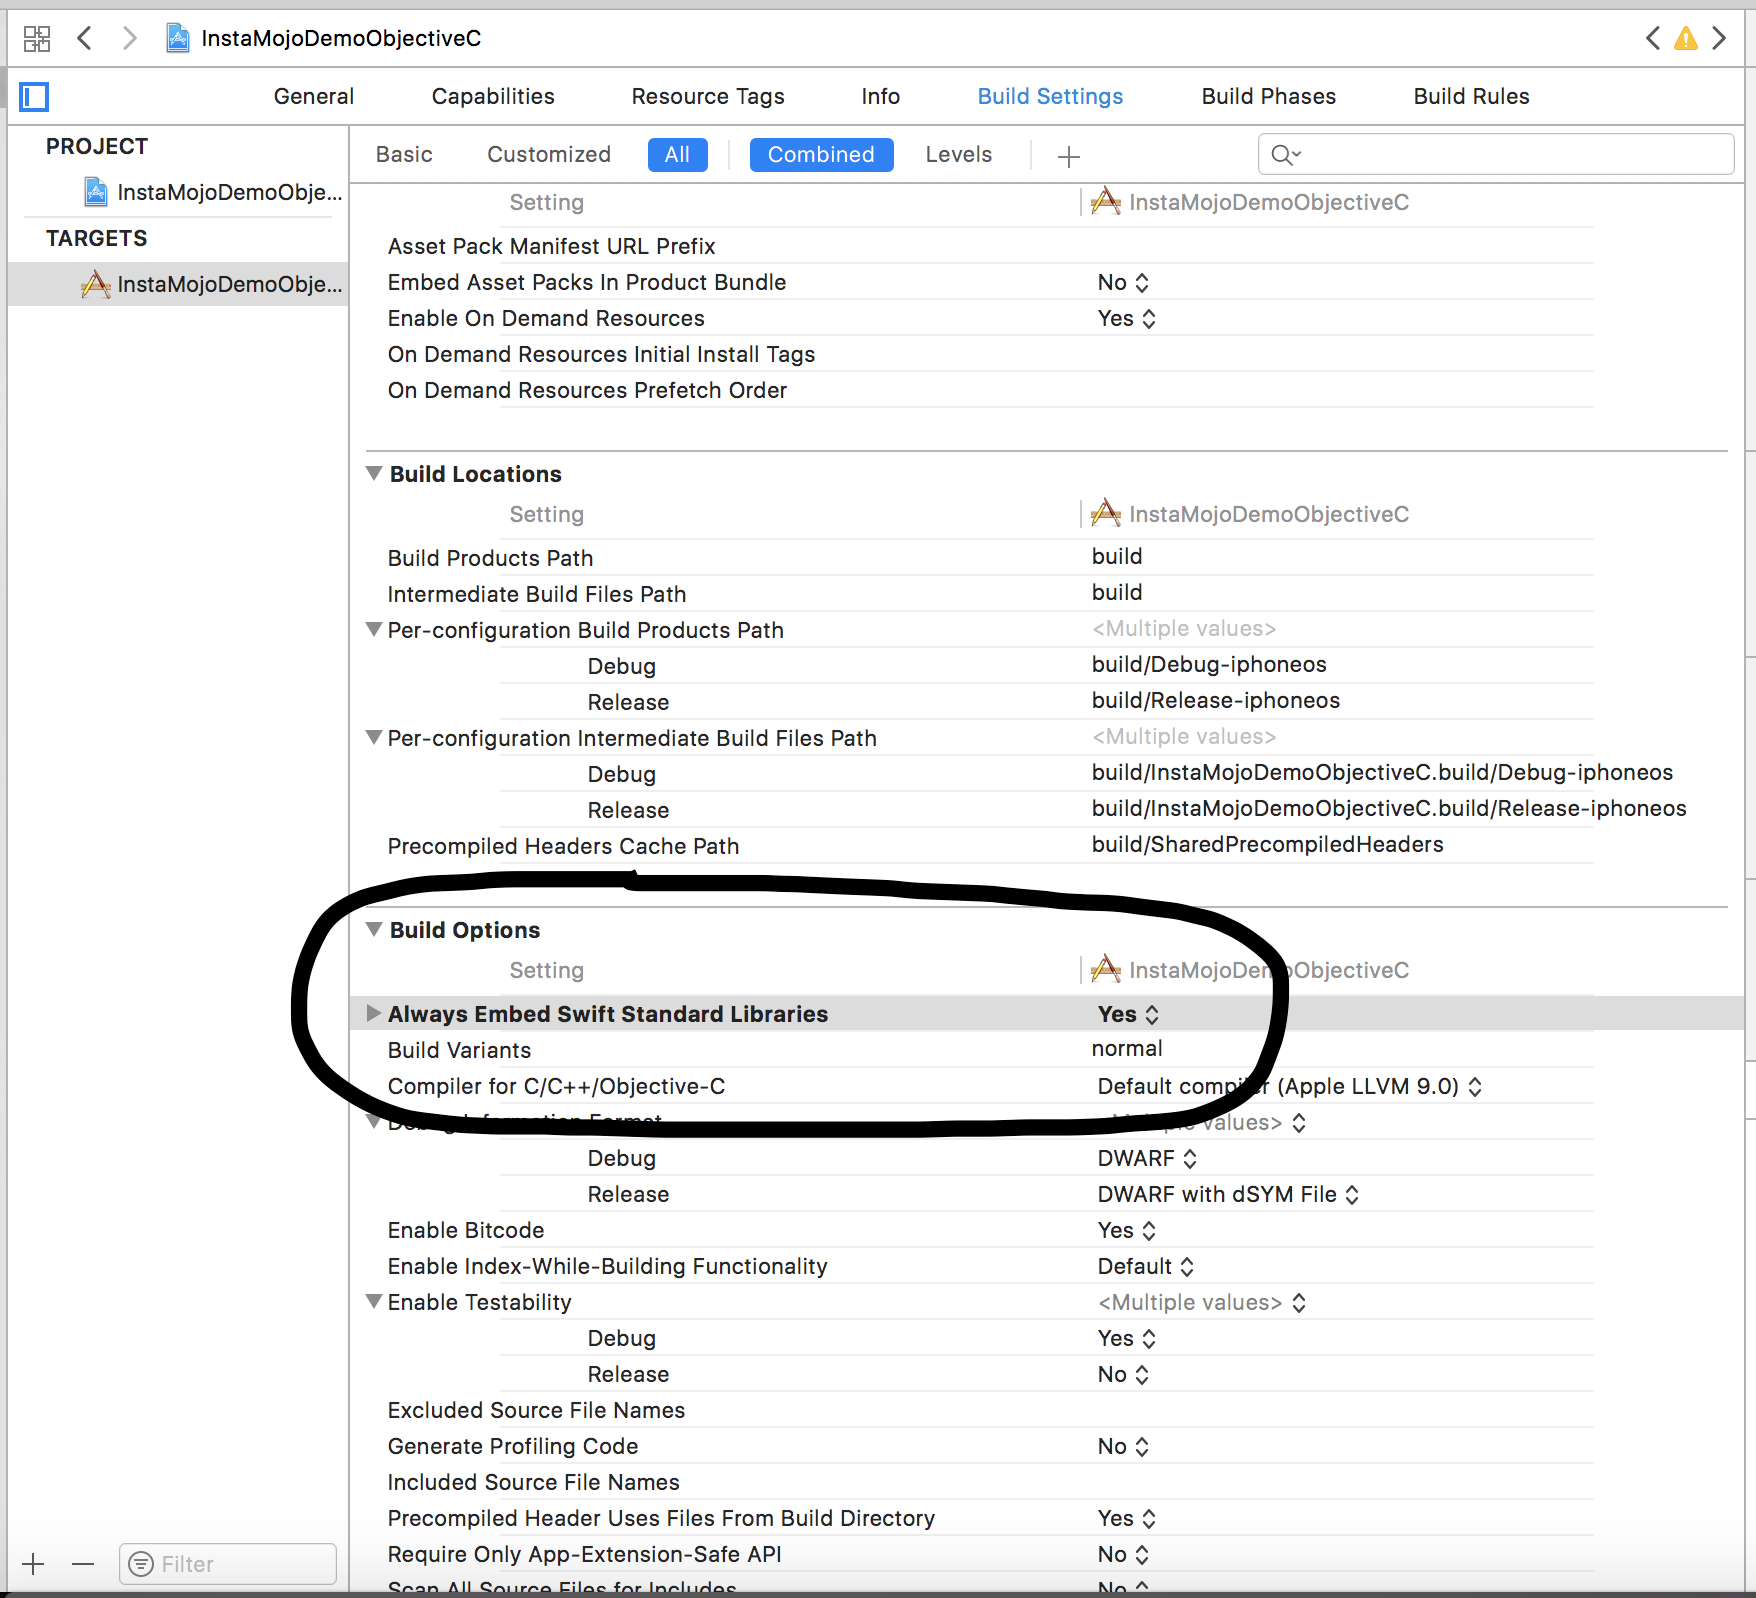
If your project uses only Objective C, then the swift frameworks are not included. In that case, Instamojo framework can not be added to your project.
As a workaround to this issue, in Build Options set
Always Embed Swift Standard Libraries = YES

Backend Integration
You need to host a code snippet that gets an access token from Instamojo. Remember to insert your production credentials in the snippet below and host it on your server.
Keep a URL to this code ready. E.g. https://yourwebsite.com/access_token.php
Production Credentials
Remember to insert your production credentials in Client Id and Client Secret
<?php

$curl = curl_init();

curl_setopt_array($curl, array(
  CURLOPT_URL => "https://api.instamojo.com/oauth2/token/",
  CURLOPT_RETURNTRANSFER => true,
  CURLOPT_ENCODING => "",
  CURLOPT_MAXREDIRS => 10,
  CURLOPT_TIMEOUT => 30,
  CURLOPT_HTTP_VERSION => CURL_HTTP_VERSION_1_1,
  CURLOPT_CUSTOMREQUEST => "POST",
  CURLOPT_POSTFIELDS => "grant_type=client_credentials&client_id=YOUR_CLIENT_ID&client_secret=YOUR_CLIENT_SECRET",
  CURLOPT_HTTPHEADER => array(
    "cache-control: no-cache",
    "content-type: application/x-www-form-urlencoded"
  ),
));

$response = curl_exec($curl);
$err = curl_error($curl);

curl_close($curl);

if ($err) {
  echo "cURL Error #:" . $err;
} else {
  echo $response;
}
import requests

url = "https://api.instamojo.com/oauth2/token/"

payload = "grant_type=client_credentials&client_id=YOUR_CLIENT_ID&client_secret=YOUR_CLIENT_SECRET"
headers = {
    'content-type': "application/x-www-form-urlencoded",
    'cache-control': "no-cache"
}

response = requests.request("POST", url, data=payload, headers=headers)

print(response.text)
var request = require("request");

var options = { method: 'POST',
  url: 'https://api.instamojo.com/oauth2/token/',
  headers:
   { 'cache-control': 'no-cache',
     'content-type': 'application/x-www-form-urlencoded' },
  form:
   { grant_type: 'client_credentials',
     client_id: 'YOUR_CLIENT_ID',
     client_secret: 'YOUR_CLIENT_SECRET' } };

request(options, function (error, response, body) {
  if (error) throw new Error(error);

  console.log(body);
});
curl -X POST -H "Content-Type: application/x-www-form-urlencoded" -H "Cache-Control: no-cache" -d 'grant_type=client_credentials&client_id=YOUR_CLIENT_ID&client_secret=YOUR_CLIENT_SECRET' "https://api.instamojo.com/oauth2/token/"
When you hit this URL, here is the expected outcome:
{
  "access_token": "9sFgDhiBqZO0NwQoga5b0TBvFcCFjR",
  "expires_in": 36000,
  "token_type": "Bearer",
  "scope": "read write payouts:read payments:read payments:fulfil payments:refund"
}
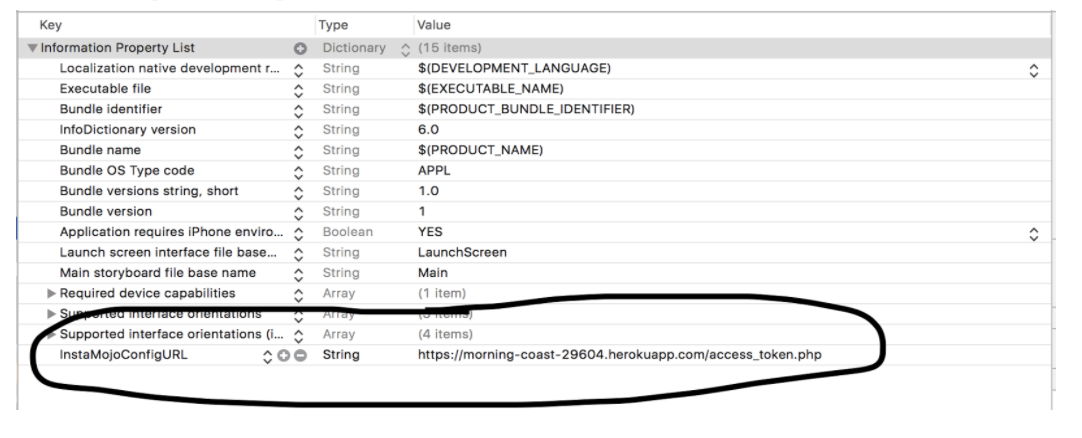
Add the Get Access Token URL in your info.plist under the key “InstaMojoConfigURL”

Swift Integration
- Import InstaMojoiOS
- Pass along the Order Details: Purpose, email, mobile and implement a completion block which returns success boolean and message string
IMConfiguration.sharedInstance.setupOrder(purpose: "buying", buyerName: "Shardul", emailId: "[email protected]", mobile: "7875432991", amount: "20", environment: .Production, on: self) { (success, message) in
            DispatchQueue.main.asyncAfter(deadline: DispatchTime.now() + 1, execute: {
                if success {
                    let alert = UIAlertController(title: message, message: nil, preferredStyle: UIAlertControllerStyle.alert)
                    alert.addAction(UIAlertAction(title: "Ok", style: UIAlertActionStyle.cancel, handler: nil))
                    self.present(alert, animated: true, completion: nil)
                } else {
                    let alert = UIAlertController(title: message, message: nil, preferredStyle: UIAlertControllerStyle.alert)
                    alert.addAction(UIAlertAction(title: "Ok", style: UIAlertActionStyle.cancel, handler: nil))
                    self.present(alert, animated: true, completion: nil)
                }
            })
        }
Objective-C Integration
#import <InstaMojoiOS/InstaMojoiOS-Swift.h>- Pass along the Order Details like Purpose, email, mobile etc
And implement a completion block which returns success boolean and message string
[[IMConfiguration sharedInstance] setupOrderWithPurpose:@"buying" buyerName:@"Shardul" emailId:@"[email protected]" mobile:@"7875432991" amount:@"20" environment:EnvironmentProduction on:nil completion:^(BOOL success, NSString * _Nonnull message) {
        dispatch_after(dispatch_time(DISPATCH_TIME_NOW, (int64_t)(1 * NSEC_PER_SEC)), dispatch_get_main_queue(), ^{
            UIAlertController *alert = [UIAlertController alertControllerWithTitle:message message:nil preferredStyle:UIAlertControllerStyleAlert];
            [alert addAction:[UIAlertAction actionWithTitle:@"Ok" style:UIAlertActionStyleCancel handler:nil]];
            [self presentViewController:alert animated:true completion:nil];
        });
    }];
