Instamojo developer platform will enable developers to publish an application that should be hosted by the developer on their end and will have the following information points shown on the Instamojo App store
- Application Logo
- Application Name
- Application Description
- Application Category
- Application Images (Up to 5 high-quality images)
- Application Video (Youtube video link - How to use the App)
- App URL (App to be hosted by the developer and a URL needs to be provided, this URL should
open in an iframe on Instamojo Appstore) - Redirect URI (For OAuth redirection)
- Data Access Permissions requirement from the merchants
App URL will be the URL to which the merchant from Instamojo will be taken to, once they click on the 'Subscribe' button on the App page. The App URL will be a URL pointing to the App developers domain, where the AUTH API endpoints will be triggered for obtaining the consent from the merchant as well as the access token corresponding to the merchant.
To set up a Backend App:
Fill in the details for the above-mentioned parameters and go ahead with the setup. Select the permissions for which you will be making the API calls. For eg: Orders read, Orders write, Products read.
Once the permissions are selected and submitted, you are ready to run our API endpoints and test ahead.
To set up a Frontend App:
Things to configure while you are submitting an App for utilizing script:

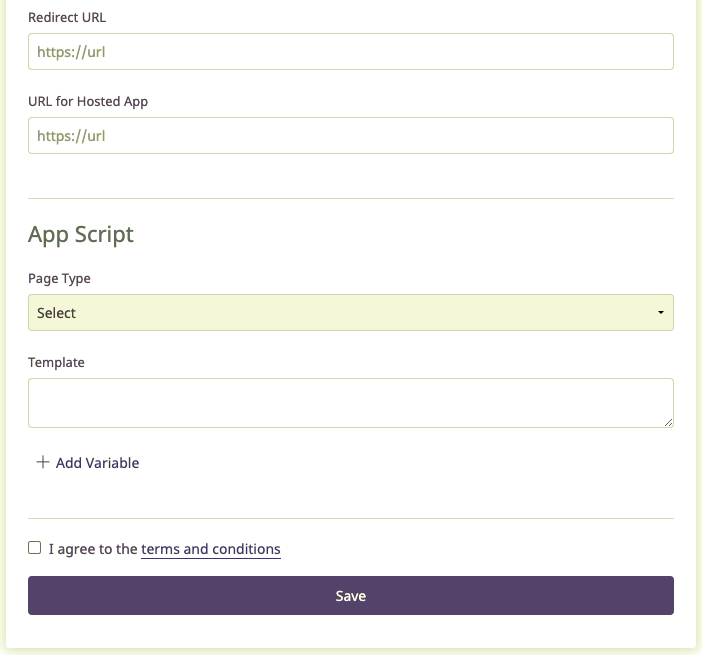
- If you are submitting an app that does not require the merchant to be redirected to your platform for the script to run, then both the URL params (Redirect and Hosted app - ref above screenshot) can be skipped.
NOTE:
A use-case for your app to not require the redirection and hosted app URL would be when your script has no variables or that there are variables, but the merchant is manually updating the value for the variables on the Instamojo interface.
A use-case for your app to require the redirection and hosted app URL would be where you, as the developer, are the ones updating the value for the variables once the merchant authorizes you to perform this action.
For this, the authorization code will be shared with you via the redirection URL that is provided. The merchant will be able to access your interface, if you require so, via the hosted app URL. You need only the authorization to hit our API endpoint and facilitate the script update action.
Also, you cannot add or remove the redirect or hosted app URLs while editing the app. You can only modify the values of already added URLs. Adding or removing these URLs is not permitted once the app is created irrespective of the app status (eg, even when the app is not live yet).
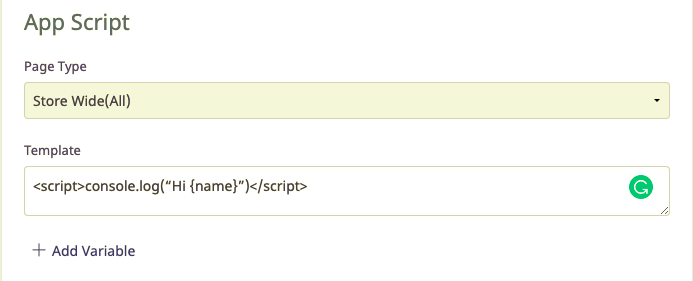
Different types of Page types are:
a) Product page - the script will be applied to all product pages
b) Category page - the script will be applied to all category pages
c) Custom page - the script will be applied to all custom pages created by the merchant
d) Store pages (Home/FAQ, etc) - These are pages that do not belong to the Product, Category or Custom pages. A few examples would be the Home page and FAQ page
[d = e - (a+b+c)]
e) Store wide (All) - the script will be applied on all pages of the store
[e = a+b+c+d]

-
When you add the script, ensure that the variables are provided in curly brackets (ref above
screenshot). -
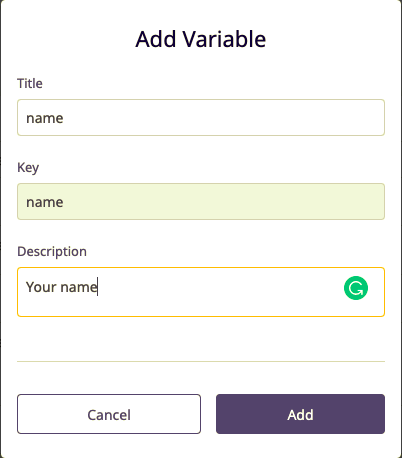
These variables need to be declared in the (+ Add Variable) section.

-
When adding a variable, ensure that a description is given for the variable so that the user
experience is smooth. -
Once submitted, if you have provided a redirection URL, the permission page will be shown,
where you can tick the ‘Script Values’ permission. If a redirection URL is not provided, the
permission page will not be shown.
